If you’ve been following my work for more than a few weeks then you might have winced a bit when you saw the image at the top of this blog entry.
The curly oak figure in the chest is a bit of a departure for me. For the last 20 years I’ve sought out boards that have a mellow, understated grain. This has always been intentional. Loud woods can obscure a good form or – put another way – attract unwanted attention away from a weak form.
For me, the form of a piece is what I like (or dislike) the most. Incidentally, that’s why I like paint. Nothing strips away the bread and circuses of fiddleback hoo-ha like a democratic coat of pigment.
So what the heck is going on in the above photo? Short answer: I don’t believe in free will.
Longer answer: I’ve had this chest design in my sketchbook for many months and decided in May to release itself on its own recognizance. My initial plan was to build it in white maple or Baltic birch. But while buying some oak at Frank Miller Lumber in Union City, Ind., there were four boards of curly quartersawn white oak sitting in the middle of the warehouse.
I put my measuring tape on them and realized that there was exactly enough to make my chest design. The price was ridiculously cheap. I had the money.
The oak is outrageous, and so I did what I could to turn down its visual volume. Usually you’ll read articles about how to accentuate curled woods with an undercoat of linseed oil or dye. I did neither of these things. In fact, I muted the curl by using a super blond shellac instead of my typical favorite, garnet.
Even so, I was worried about the curl obscuring the piece’s form.
I’m not quite done with the finishing process. I still need to rub out the shellac and add a coat of a linseed oil/wax that I’ve become quite fond of (more on that later). That should tone down the gloss of the shellac and I’ll end up where the figure and the form are in balance.
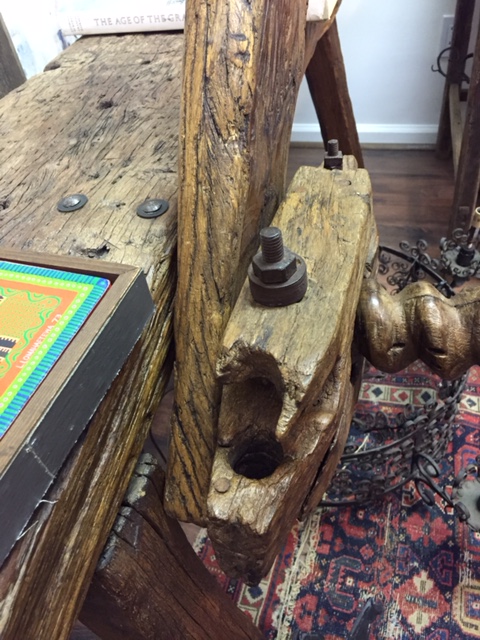
Mark Firley at The Furniture Record (one of my favorite blogs), sent me these photos of a workbench he encountered in his travels. He was on;y able to snap these photos before the antiques dealer shooed him away.
My first (and fifth) reaction: A Narwhal and some ship’s tackle had a baby. And it didn’t live….
So if you look at the top of the bench, you can see there is probably a vise nut bolted to the underside of the workbench’s top.
The bolts might be (OK, almost certainly are) a later addition to the bench. Judging from the wear and tear on the thing (and the dealer’s guess at the age), that hardware is new.
But then everything goes sideways when we consider the vise. The vise screw itself looks handmade – not manufactured – and could very well be from the same era as the bench itself. The big thing sticking in the air is definitely… sticking in the air.
To my eye it resembles a leg vise chop after a vicious dog attack. And then there’s the second vise nut in front of that. It’s bolted in places (perhaps a repair?).
I wonder if the vise screw is in backwards and its hub is under the bench. And we just have, for some odd reason, two vise nuts. That’s my best guess.
Katy managed to make 34 more tins of soft wax this week. It’s available in her etsy store via this link. She’s hard at work on another batch during the times when she isn’t signing rhymes about Black Phillip from “The VVitch.”
Apologies for the following statement, but “The Woodworker: The Charles Hayward Years” is a gold mine of craft knowledge. Even though we were mired in the project for more than seven years (and I should despise it), the finished books are incredibly useful in my everyday work.
Yesterday proved that point. You might remember this blog entry where I reprinted a 1964 article on making a staked stool that was one of the thousands of articles we sorted through for our two-volume set.
In that article, S.H. Glenister recommended boring mortises for a staked stool before shaping the legs. This is exactly how I work with square mortise-and-tenon projects, but is the opposite of how I work when building post-and-rung assemblies with round tenons and mortises.
I can’t say why it never occurred to me to bore the round mortises first when the stock was square. Just a brain defect, I guess.
So when making the post-and-rung base for a new design for a chest of drawers, I followed Mr. Glenister’s advice. It worked brilliantly and everything turned out perfectly square and centered with little fuss.
The only hiccup was when turning the mortised bits. You need to lighten up your pressure on the tool as you pass the tool by the mortises. I didn’t have any of them catch, but if you use consistent pressure the areas around your mortises will end up a little skinnier.
Give it a try next time.
By the way, we are hard at work at designing the next two volumes of “The Woodworker.” Vol. III on joinery is now completely designed and needs only a final edit. Meghan, the designer, is now laying out Vol. IV, which is on the workshop and furniture. There is still a lot of work ahead, but we are plowing forward.